
Democratus
Mongoose
After stopping the Centauri blockade runners at Demeter, the Dilgar easily captured the planet. This was followed by tea and virus bombings from orbit.
The Dilgar were riding high. Multiple "Other Duties" rolls had given them a new strategic point and the terror caused by their casual genocide gave pause to all their enemies (two "Terror Reigns" results barred both other players from attacking my points).
It was time to go commerce raiding (attack the Trade Route location) and refill the war funds. The Earthers finally found some courage and sent a substantial fleet to stop the Dilgar raiders. Knowing that this would happen, the Dilgar set an ambush.
Unfortunately the Dilgar underestimated how upset the humans would be about the genocide issue, as nearly the entire Earthforce fleet showed up on sensors.
Still...decisive action was the Dilgar way and orders were orders. The Dilgar sprung the trap and attacked!
Scenario: Ambush
Priority: War
Points: 5/3
Setup:
Earthforce:
Earth occupied the center of the map, in a long column. Up front was an Orestes, a Nova, and two Hyperions. At the rear was a mirror of the same. The middle of the formation was built around a solid block of missile cruisers and a heavy carrier.
Orestes Battleship: Winfield Scott, Alexander Suvorov
Nova Dreadnought: Chronos. Medusa
Hyperion Cruiser: Delhi, Richmond, Veracruz, Savannah, Jakarta, Stockholm
Hyperion Missile Cruiser: Marakesh
Hyperion Assault Cruiser: Guan Yu, Vostok
Avenger Heavy Carrier: Mitchell
Artemis Escort Frigate: Hawk, Norden
Oracle Scout Cruiser: Hind, Curran, Malachi
Sagittarius Cruiser: Morgan, Franklin, Barber, Mercury
Alpha Wing (5 Nova Flights)
Beta Wing (5 Nova Flights)
Dilgar:
The dilgar attacked the starboard (right) side of the earth formation. Their deployment zone was completely filled with Dust Clouds. The hope was that the stealth could help protect the vulnerable scouts and fleet carrier.
Scout pentacon is on my far left, to the rear of all the earth ships.
Pentacon Omen is in my center, positioned about 1/3 from the rear of the earth column. All these ships have 10" range bolters and thus must rush in close to attack.
Pentacon Reaper in on the right. It is about even with the center of the Earther column, lined up for an attack against the carrier Mitchell. I need to kill this ship to reduce the effectiveness of the earth fighters.
Pentacon Reaper:
Tikrit (Reaper, Ravager), Omelos (Flawless, Vigalant), Ochlavita-Ki (Dogma)
Pentacon Omen:
Targrath (Omen, Slayer), Ochlavita-Ki (Certainty), Jashakar Tae (Pistol, Rifle)
Scout Pentacon:
Ochlaviata-Ki (Doctrine), Jashakar Vi (Hunter, Searcher, Finder, Quester)
Garasoch Heavy Carrier: Venom
Fighters:
15 Torpedofighters, 8 Dartfighters.
12 Torpedofighters will begin on the board. I place them out of range of the earth fighters. The rest will be in hangars, awaiting launch into the battle.
Turn 1:
The Earther is hampered by the first turn rule that requires a CQ check of 10 to do anything but move forward 6". A few of his ships, notably two Hyperions in the center (Savannah and Stockholm) start to turn but are unable to boresight any Dilgar ships.
All earth ships give the Close Blast Doors! (CBD) order. This is wise for nearly all ships, but it will prevent the heavy carrier Mitchell from launching its remaining fighters this turn.
The Dilgar open with three passes for their pentacons. Then the carrier Venom issues a Scramble! order, which it fails due to interference from the dust cloud. A mixed blessing, that cloud.
Scout Pentacon issues All Stop! orders all around. They are in prime position to use their sensors to paint enemy vessels.
Pentacon Omen moves forward to be within 10" of the enemy column but outside of the dangerous 8" secondary weapons. The Targraths both Concentrate Firepower! against the Sagittarius Barker. I've learned to fear the earth missiles.
Pentacon Reaper moves forward to guarantee a full strike against the carrier Mitchell. Both Tikrits give Concentrate Firepower! orders against the Mitchell. The two Omelos give Concentrate Firepower! orders against the Sagittarius Barker. The other ships will act in support.
Earth must move its fighters first and is unable to reach dogfight range with the Dilgar fighters. So they instead move into support positions with various earth ships.
Dilgar bombers (12 of them) move into position around the earth Hyperion Savannah. This ship is under full control and has managed to come dangerously close to pentacon Reaper.
Scouts light up the Savannah and a few other ships. Earth scouts break the stealth of the Dilgar carrier Venom and light up the Reaper and the Omen.
The Dartfighters fire at Savannah, depleting its interceptors and doing some damage. The interaction between scouts and fighter flights has become a cornerstone of the Dilgar tactics.
Pentacon Reaper fires:
Reaper, Ravager and Dogma open fire on the Avenger with 42 AD of Missiles and 38 AD of Heavy Bolters. Four brave fighter flights give their lives in defense but are ultimately destroyed. The mighty Avenger carrier becomes a burning hulk, taking its un-launched fighters with it.
Flawless and Vigalant open fire on the Sagittarius Barker. The ship explodes after a series of criticals detonate its reactor. The ensuing blast kills multiple fighters in the fleet and damages 4 other ships.
Pentacon Omen fires:
Omen and Slayer open fire on the Sagittarius Morgan, again splitting the ship open in a spectacular explosion which damages more ships and kills more fighter flights.
Certainty (Ochlavita-Ki), Slayer, and Pistol (Jash Tae) open fire on the bruised Savannah, only by incredible CBD rolls does the ship survive uncrippled.
Earth answers back firing what weapons it has bearing. The remaining Sagittarius cruisers fire on and heavily damage the Tikrit Reaper. The Hyperion Missile cruiser Marakesh opens fire on the Garasoch Venom with Heavy Missiles in its racks. The Venom is lightly damaged but suffers no fewer than 4 criticals. It looses the Fleet Carrier trait, has -1 DC, and two speed reductions of -2 Spd and -4 Spd. Neither side has a fleet carrier now. The remaining capital ship guns which can do so fire at my fighter flights, but they nimbly dodge them all.
No Dilgar ships are crippled in the exchange. A lucky break.
A few other ships fire what weapons they have bearing, damaging the Jash Tae Pistol. No Dilgar ships are crippled. The forward ships of the Earth fleet are slowly coming about to fight. The rear ships in the fleet are in close quarters but still only have their side arcs toward the Dilgar.
My opponent mutters something about Nelson and Trafalgar. He berates himself for putting half his strong ships up front and half in back.
---
Turn one went well for the Dilgar, as should be expected in the first turn of an ambush. I miscalculated how much firepower it takes to destroy a Sagittarius and therefore wasted all the fire from one of my Targraths and one Omelos. I only killed three ships, but one was the carrier.
I also learned the incredible power of squadrons. Nothing says "die, inferior scum!" like multiple ships firing at the same time.
The Earth fleet is out of position with its starboard side to me and they are about as maneuverable as cows. Hopefully I can use my speed and maneuver to avoid the worst of their reprisal.
For earth, they still have a huge mass of ships available to fight and can turn this around if their weapons are brought to bear.
Turn 2:
Initiative Dilgar.
I break up my scouting pentacon to act as init sinks. Each of the scout ships (and their command destroyer) gives an APTE! order and races forward 18" to put the rear of the Earth formation in range of their weaopns.
Then I pass twice with my other two pentacons. However, the humans simply have too many ships and I don't want to break up my two offensive pentacons. So I turn to the left move forward and then turn back forward again - shifting both pentacons forward and to the left. Thus both pentacons have the aft ships of the earth fleet in their sight. These ships are a Nova (the Medusa), an Orestes (the Alexander Suvorov), and an Artemis Escort frigate (the Norden).
The carrier Venom crawls along in the dust cloud and issues an All Hands to Deck! order. I want that Fleet Carrier trait before I loose too many fighters.
Earth attempts many Come About! orders with its forward elements, trying desperately to bring them into the battle. All orders fail as they lurch in a slow turn to the right. The main result of this is that the Sagittarius cruisers still have the same starboard arc facing me, the slow loading weapons will not fire this turn.
Earth's middle ships, primarily Hyperions, now move. Three of them turn away from me and put their rear boresight heavy lasers on the Ravager. The Nova Medusa moves up for a point-blank broadside on the Ravager as well. The remaining middle ships, mostly Hyperion Assault cruisers and the standard Hyperion Stockholm move to bracket Reaper.
There are still many earth fighters about and I need to be able to use my bombers freely. So I send 4 of my Torpedofighers on suicide dogfights against earth fighters to tie them up. Then I move the remaining 10 within range of the Nova Medusa.
My scouts light up the Medusa, the Norden, and the Franklin. The Earther scouts light up the Reaper and the Flawless and again break the stealth on the carrier Venom.
The dogfights go as expected, with the human lending Anti-fighter to his own fighters to wipe out my brave pilots. Four of four rolls kills a fighter flight. Earth gunnery is impressive.
Torpedo fighters strike the Nova Medusa and strip its interceptors, doing light damage.
Pentacon Reaper fires:
They unload into the Nova Medusa, a massive strike with bolters and energy pulsars which destroys the hapless ship before its guns are able to speak. This eases my mind as I did not want to feel the wrath of that mighty ship's guns.
Earth responds with a broadside from the Orestes Alexander Suvorov which heavily damages the Ravager, knocking out the Anti-fighter batteries.
Pentacon Omen opens fire:
Bolter fire destroys the escort frigate Norden which is adrift and will explode next turn. The Sagittarius Franklin is also damaged heavily.
Earth's Hyperions now open fire with their rear boresight heavy lasers. Between the three of them they reduce the Ravager to within 5 points of being crippled. Criticals reduce all weapons by -2 AD and no Special Actions may be taken.
The tiny scout ships each fire upon the heavily damaged Savannah. One finally scores a spectacular 6,6 critical, which is triple damage thanks to the Masters of Destruction rule. The Savannah is destroyed in a fireball which kills a few more Earther fighters.
Finally, the Earth Assault cruisers and the Hyperion Stockholm open fire on the Tikrit Reaper, taking her to about half damage, criticals reducing her speed by one and taking aft weapons offline.
The Carrier manages to repair both speed criticals, but can't bring the Fleet Carrier trait back online or fix the -1 DC. Drat!
---
At the end of turn 2, the Earthers have lost 6 ships: Savannah, Barker, Morgan, Medusa, Mitchell, and Norden and about 16 fighters. That's 15 VP so far. But the Earthers still have 4 War points of ships on the board to my 3 War points.
The Dilgar have lost no ships, but both Tikrit Battle-level ships are heavily wounded and on the verge of destruction. The Omelos Flawless is also close to folding. The loss of the Tikrits (5 VP each) and the Flawless (3 VP) would put the victory point advantage back in the hands of Earth (they would get the "Holding Ground" bonus of 5 VP).
With the Sagittarius and Oracle missiles ready to go in turn 3 the Earther can easily accomplish the destruction of these 3 ships and turn the whole thing around.
Thus, I will have to stay and try to wreak more damage to tip the scales. And hope I can then disengage before the other half of the earth fleet can get turned around.
In the picture above you can see that my fleet is concentrated (piled, even) against the rear of the earther column. In the distance you can see the front of the formation (including a Nova, an Orestes, and several Hyperions) trying to turn around.
This blurrier (sorry) picture from above shows how concentrated the Dilgar forces are. You can see the white hyperion counters to the upper right that have all managed a rear boresight against a Tikrit. The fighters clustered together at top are all Thorun Torpedofighters.
Turn 3:
Initiative Dilgar. But earth has far too many ships to use as sinks.
The Dilgar take stock of damage dealt and received and decide to begin a staged withdrawal.
Pentacon Reaper heads straight away from the battle and toward the far edge of the board.
Pentacon Omen moves through the earth formation and hooks right to try and get a kill on the Hyperion Jakarta - one of the three Hyperions that had so damaged the Ravager last turn. Omen succeeds at an Alpha Strike! order.
The carrier Venom gives a Scramble! order and moves, turning to the right in an attempt to get off the board.
My primary mission right now is to save the two wounded Tikrit-class ships. If the enemy Sagittarius missile cruisers manage to unload into them I will most likely loose them and possibly the battle. The scout Finder bravely gathers the courage to do what must be done. It ramps up to ramming speed and hurls itself into the side of the Franklin, heavily damaging it. The next scout, Searcher gives the same order but fails the opposed crew quality roll and glides past Franklin to end up in the middle of the front of the earth formation - in broadside range of a Nova and an Omelos. Ouch.
The remaining frigates (two scouts and two Missile frigates), can't angle for a good ram but move to point blank range next to the two remaining Sagittarius cruisers.
The earth fleet is struggling to come about and engage the Dilgar. All of the forward ships continue to wheel right. With no other target in sight, seven ships (three Oracle, three Hyperions, and an Omelos) boresight the Garasoch Venom.
Toward the rear, the Omelos Alexander Suvorov makes a Come about! order and manages to rear-boresight a Dilgar missile frigate, the Pistol. The two Assault Hyperions move into firing range of the scout ships.
Dilgar fighters move to take attack position around the Sagittarius cruiser Franklin. A few fighters move to pin the remaining 5 Nova flights in a dogfight to keep them from interfering.
Earth scouts break the Dust Cloud stealth of the Venom and paint the Reaper. Dilgar scouts paint all the Sagittarius cruisers and the Hyperion Jakarta.
The torpedofighters do an excellent job of wrecking the wounded Franklin. The ship explodes spectacularly. Unfortunately I miss-gauged the distance and my fighters were also caught in the explosion. A grave tactical error cost me my entire force of assault fighters. A harsh lesson that I will not forget. Torpedofighters have a range of 6"!
Dilgar opened fire first, the frigatePistol fired and heavily wounded the Mercury.
Earth responded by firing upon and destroying Searcher before it could contribute anything meaningful. It's explosion in the close quarters damages several earth ships.
Command Destroyer Doctrine of the former scout pentacon fires and finishes off the last Sagittarius! I relax a bit, as I feel that I have taken massive pressure off of the poor Ravager and Reaper.
Earthforce then unleashes a hail of beam fire at the Garasoch Venom. Fully 24 dice of double damage beams are unleashed on the carrier. The gallant ship survives until the very last blast but finally crumples under the massive display of earth firepower. I make a note to try much harder to avoid earth boresights.
Pentacon Omen now fires on the earth cruiser Jakarta, vaporizing it in a hail of missiles and bolter fire. Sadly, I never get to see any repeated crits to leverage the Alpha Strike! order. But the job gets done.
--
This turn is beginning to see the tide turn. Earth's numbers are starting to show. The Dilgar have lost 3 frigates and a heavy carrier. Earth has lost two Sagittarius missile cruisers and a Hyperion. But next turn will see the forward half of the earth fleet finally bring its forward arcs (and boresights) toward the Dilgar contingent. The clock is running out.
Pentacon Reaper (on the right) begins to pull away from the battle. Pentacon Omen turns right to cover their escape.
Turn 4:
Initiative Dilgar.
Pentacon Reaper continues to limp straight away from the battle zone.
Pentacon Reaper on the run. Will the wounded heavy cruisers manage to escape?
Pentacon Omen breaks up to init sink and races toward the far edge of the board as well. It's time to fly.
Only the command destroyer Doctrine is unable to get free of the earth formation. So it plunges bravely into the teeth of the enemy.
The earthers bring their fleet about. The only ship within range of meaningful fire is Doctrine. So they surround it and prepare for some revenge.
Then, I'm surprised by the Omelos Alexander Suvorov as it makes another Come About! order and manages to boresight the fleeing Ravager at 24" - just inside her range!
Doctrine defiantly fires upon an earth cruiser, scratching some paint. The Earthforce fleet then boards Doctrine and begin the process of capture.
The Alexander Suvorov fires its massive heavy laser crippling and skeletoning, but not killing, the Tikrit heavy cruiser Ravager, leaving it with a mere 2 points of damage and 1crew remaining!
--
This turn nearly saw the destruction of one of my largest ships. Had it been destroyed the game would have been much closer and may have forced me to do another battle pass to rebalance the scales.
I got lucky and disengaged at this point. The Dilgar fleet was battered and bruised but victorious! Earthforce complacency had been shattered.
Result:
Earth losses:
1 Avenger Heavy Carrier (3 VP)
2 Hyperion Heavy Cruisers (6 VP)
1 Nova Dreadnought (3 VP)
4 Sagittarius Missile Cruisers (8 VP)
1 Artemis Escort (2 VP)
1 Flight Nova Starfuries (1 VP)
----
23 VP
Dilgar losses:
1 Garasoch Heavy Carrier (3 VP)
2 Jashakar Vi Scouts (2 VP)
1 Jashakar Tae Torpedo Ship (1 VP)
1 Crippled Tikrit Heavy Cruiser (2 VP)
1 Ochlavita Ki Captured (4 VP)
Last man on board (5 VP)
---
17 VP
Dilgar victory!
Conclusion:
This mission was a picture perfect ambush. The mission plays perfectly to the strengths of the Dilgar - massive Attack Dice at close range. And was the bane of Earthforce - denial of forward arcs and boresights.
Attacking the rear of the formation allowed me to face half the enemy fleet and then disengage before the front could consolidate. The high speed an agility of Dilgar warships really made itself felt.
Campaign Aftermath:
Both sides suffered a great deal of damage, Earthforce catching the worst of it. The trade route was captured by the Dilgar and, more importantly, the XP earned by the dilgar ships allowed them to roll half a dozen "Other Duties" rolls, including one (Terror Reigns) which prohibits the Centauri from attacking the Dilgar in the next turn.
Elswhere, Earthforce lost a minor planet to the Centauri in a Carrier Clash mission. Earth might have had a chance, but a Dilgar raiding (another 'Other Duty') the previous turn reduced the Earther force by one point.
The Dilgar were riding high. Multiple "Other Duties" rolls had given them a new strategic point and the terror caused by their casual genocide gave pause to all their enemies (two "Terror Reigns" results barred both other players from attacking my points).
It was time to go commerce raiding (attack the Trade Route location) and refill the war funds. The Earthers finally found some courage and sent a substantial fleet to stop the Dilgar raiders. Knowing that this would happen, the Dilgar set an ambush.
Unfortunately the Dilgar underestimated how upset the humans would be about the genocide issue, as nearly the entire Earthforce fleet showed up on sensors.
Still...decisive action was the Dilgar way and orders were orders. The Dilgar sprung the trap and attacked!
Scenario: Ambush
Priority: War
Points: 5/3
Setup:
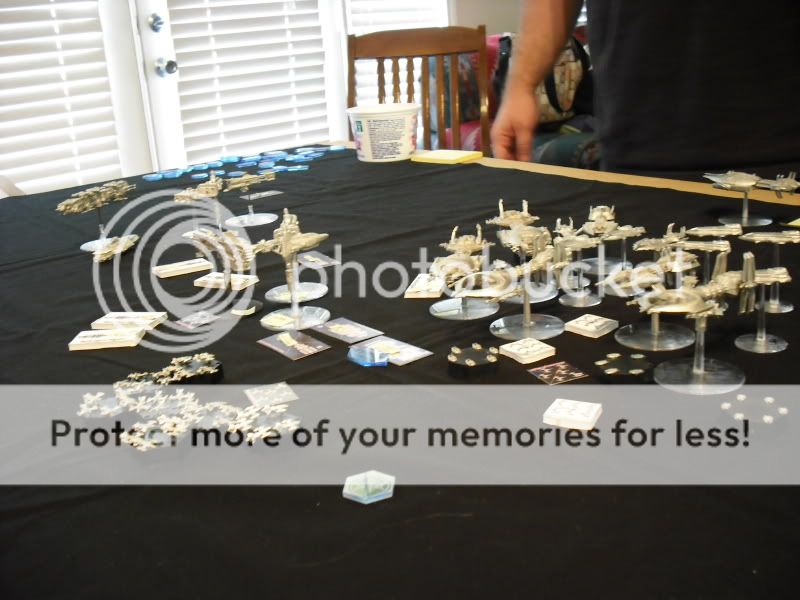
Earthforce:
Earth occupied the center of the map, in a long column. Up front was an Orestes, a Nova, and two Hyperions. At the rear was a mirror of the same. The middle of the formation was built around a solid block of missile cruisers and a heavy carrier.
Orestes Battleship: Winfield Scott, Alexander Suvorov
Nova Dreadnought: Chronos. Medusa
Hyperion Cruiser: Delhi, Richmond, Veracruz, Savannah, Jakarta, Stockholm
Hyperion Missile Cruiser: Marakesh
Hyperion Assault Cruiser: Guan Yu, Vostok
Avenger Heavy Carrier: Mitchell
Artemis Escort Frigate: Hawk, Norden
Oracle Scout Cruiser: Hind, Curran, Malachi
Sagittarius Cruiser: Morgan, Franklin, Barber, Mercury
Alpha Wing (5 Nova Flights)
Beta Wing (5 Nova Flights)
Dilgar:
The dilgar attacked the starboard (right) side of the earth formation. Their deployment zone was completely filled with Dust Clouds. The hope was that the stealth could help protect the vulnerable scouts and fleet carrier.
Scout pentacon is on my far left, to the rear of all the earth ships.
Pentacon Omen is in my center, positioned about 1/3 from the rear of the earth column. All these ships have 10" range bolters and thus must rush in close to attack.
Pentacon Reaper in on the right. It is about even with the center of the Earther column, lined up for an attack against the carrier Mitchell. I need to kill this ship to reduce the effectiveness of the earth fighters.
Pentacon Reaper:
Tikrit (Reaper, Ravager), Omelos (Flawless, Vigalant), Ochlavita-Ki (Dogma)
Pentacon Omen:
Targrath (Omen, Slayer), Ochlavita-Ki (Certainty), Jashakar Tae (Pistol, Rifle)
Scout Pentacon:
Ochlaviata-Ki (Doctrine), Jashakar Vi (Hunter, Searcher, Finder, Quester)
Garasoch Heavy Carrier: Venom
Fighters:
15 Torpedofighters, 8 Dartfighters.
12 Torpedofighters will begin on the board. I place them out of range of the earth fighters. The rest will be in hangars, awaiting launch into the battle.
Turn 1:
The Earther is hampered by the first turn rule that requires a CQ check of 10 to do anything but move forward 6". A few of his ships, notably two Hyperions in the center (Savannah and Stockholm) start to turn but are unable to boresight any Dilgar ships.
All earth ships give the Close Blast Doors! (CBD) order. This is wise for nearly all ships, but it will prevent the heavy carrier Mitchell from launching its remaining fighters this turn.
The Dilgar open with three passes for their pentacons. Then the carrier Venom issues a Scramble! order, which it fails due to interference from the dust cloud. A mixed blessing, that cloud.
Scout Pentacon issues All Stop! orders all around. They are in prime position to use their sensors to paint enemy vessels.
Pentacon Omen moves forward to be within 10" of the enemy column but outside of the dangerous 8" secondary weapons. The Targraths both Concentrate Firepower! against the Sagittarius Barker. I've learned to fear the earth missiles.
Pentacon Reaper moves forward to guarantee a full strike against the carrier Mitchell. Both Tikrits give Concentrate Firepower! orders against the Mitchell. The two Omelos give Concentrate Firepower! orders against the Sagittarius Barker. The other ships will act in support.
Earth must move its fighters first and is unable to reach dogfight range with the Dilgar fighters. So they instead move into support positions with various earth ships.
Dilgar bombers (12 of them) move into position around the earth Hyperion Savannah. This ship is under full control and has managed to come dangerously close to pentacon Reaper.
Scouts light up the Savannah and a few other ships. Earth scouts break the stealth of the Dilgar carrier Venom and light up the Reaper and the Omen.
The Dartfighters fire at Savannah, depleting its interceptors and doing some damage. The interaction between scouts and fighter flights has become a cornerstone of the Dilgar tactics.
Pentacon Reaper fires:
Reaper, Ravager and Dogma open fire on the Avenger with 42 AD of Missiles and 38 AD of Heavy Bolters. Four brave fighter flights give their lives in defense but are ultimately destroyed. The mighty Avenger carrier becomes a burning hulk, taking its un-launched fighters with it.
Flawless and Vigalant open fire on the Sagittarius Barker. The ship explodes after a series of criticals detonate its reactor. The ensuing blast kills multiple fighters in the fleet and damages 4 other ships.
Pentacon Omen fires:
Omen and Slayer open fire on the Sagittarius Morgan, again splitting the ship open in a spectacular explosion which damages more ships and kills more fighter flights.
Certainty (Ochlavita-Ki), Slayer, and Pistol (Jash Tae) open fire on the bruised Savannah, only by incredible CBD rolls does the ship survive uncrippled.
Earth answers back firing what weapons it has bearing. The remaining Sagittarius cruisers fire on and heavily damage the Tikrit Reaper. The Hyperion Missile cruiser Marakesh opens fire on the Garasoch Venom with Heavy Missiles in its racks. The Venom is lightly damaged but suffers no fewer than 4 criticals. It looses the Fleet Carrier trait, has -1 DC, and two speed reductions of -2 Spd and -4 Spd. Neither side has a fleet carrier now. The remaining capital ship guns which can do so fire at my fighter flights, but they nimbly dodge them all.
No Dilgar ships are crippled in the exchange. A lucky break.
A few other ships fire what weapons they have bearing, damaging the Jash Tae Pistol. No Dilgar ships are crippled. The forward ships of the Earth fleet are slowly coming about to fight. The rear ships in the fleet are in close quarters but still only have their side arcs toward the Dilgar.
My opponent mutters something about Nelson and Trafalgar. He berates himself for putting half his strong ships up front and half in back.
---
Turn one went well for the Dilgar, as should be expected in the first turn of an ambush. I miscalculated how much firepower it takes to destroy a Sagittarius and therefore wasted all the fire from one of my Targraths and one Omelos. I only killed three ships, but one was the carrier.
I also learned the incredible power of squadrons. Nothing says "die, inferior scum!" like multiple ships firing at the same time.
The Earth fleet is out of position with its starboard side to me and they are about as maneuverable as cows. Hopefully I can use my speed and maneuver to avoid the worst of their reprisal.
For earth, they still have a huge mass of ships available to fight and can turn this around if their weapons are brought to bear.
Turn 2:
Initiative Dilgar.
I break up my scouting pentacon to act as init sinks. Each of the scout ships (and their command destroyer) gives an APTE! order and races forward 18" to put the rear of the Earth formation in range of their weaopns.
Then I pass twice with my other two pentacons. However, the humans simply have too many ships and I don't want to break up my two offensive pentacons. So I turn to the left move forward and then turn back forward again - shifting both pentacons forward and to the left. Thus both pentacons have the aft ships of the earth fleet in their sight. These ships are a Nova (the Medusa), an Orestes (the Alexander Suvorov), and an Artemis Escort frigate (the Norden).
The carrier Venom crawls along in the dust cloud and issues an All Hands to Deck! order. I want that Fleet Carrier trait before I loose too many fighters.
Earth attempts many Come About! orders with its forward elements, trying desperately to bring them into the battle. All orders fail as they lurch in a slow turn to the right. The main result of this is that the Sagittarius cruisers still have the same starboard arc facing me, the slow loading weapons will not fire this turn.
Earth's middle ships, primarily Hyperions, now move. Three of them turn away from me and put their rear boresight heavy lasers on the Ravager. The Nova Medusa moves up for a point-blank broadside on the Ravager as well. The remaining middle ships, mostly Hyperion Assault cruisers and the standard Hyperion Stockholm move to bracket Reaper.
There are still many earth fighters about and I need to be able to use my bombers freely. So I send 4 of my Torpedofighers on suicide dogfights against earth fighters to tie them up. Then I move the remaining 10 within range of the Nova Medusa.
My scouts light up the Medusa, the Norden, and the Franklin. The Earther scouts light up the Reaper and the Flawless and again break the stealth on the carrier Venom.
The dogfights go as expected, with the human lending Anti-fighter to his own fighters to wipe out my brave pilots. Four of four rolls kills a fighter flight. Earth gunnery is impressive.
Torpedo fighters strike the Nova Medusa and strip its interceptors, doing light damage.
Pentacon Reaper fires:
They unload into the Nova Medusa, a massive strike with bolters and energy pulsars which destroys the hapless ship before its guns are able to speak. This eases my mind as I did not want to feel the wrath of that mighty ship's guns.
Earth responds with a broadside from the Orestes Alexander Suvorov which heavily damages the Ravager, knocking out the Anti-fighter batteries.
Pentacon Omen opens fire:
Bolter fire destroys the escort frigate Norden which is adrift and will explode next turn. The Sagittarius Franklin is also damaged heavily.
Earth's Hyperions now open fire with their rear boresight heavy lasers. Between the three of them they reduce the Ravager to within 5 points of being crippled. Criticals reduce all weapons by -2 AD and no Special Actions may be taken.
The tiny scout ships each fire upon the heavily damaged Savannah. One finally scores a spectacular 6,6 critical, which is triple damage thanks to the Masters of Destruction rule. The Savannah is destroyed in a fireball which kills a few more Earther fighters.
Finally, the Earth Assault cruisers and the Hyperion Stockholm open fire on the Tikrit Reaper, taking her to about half damage, criticals reducing her speed by one and taking aft weapons offline.
The Carrier manages to repair both speed criticals, but can't bring the Fleet Carrier trait back online or fix the -1 DC. Drat!
---
At the end of turn 2, the Earthers have lost 6 ships: Savannah, Barker, Morgan, Medusa, Mitchell, and Norden and about 16 fighters. That's 15 VP so far. But the Earthers still have 4 War points of ships on the board to my 3 War points.
The Dilgar have lost no ships, but both Tikrit Battle-level ships are heavily wounded and on the verge of destruction. The Omelos Flawless is also close to folding. The loss of the Tikrits (5 VP each) and the Flawless (3 VP) would put the victory point advantage back in the hands of Earth (they would get the "Holding Ground" bonus of 5 VP).
With the Sagittarius and Oracle missiles ready to go in turn 3 the Earther can easily accomplish the destruction of these 3 ships and turn the whole thing around.
Thus, I will have to stay and try to wreak more damage to tip the scales. And hope I can then disengage before the other half of the earth fleet can get turned around.
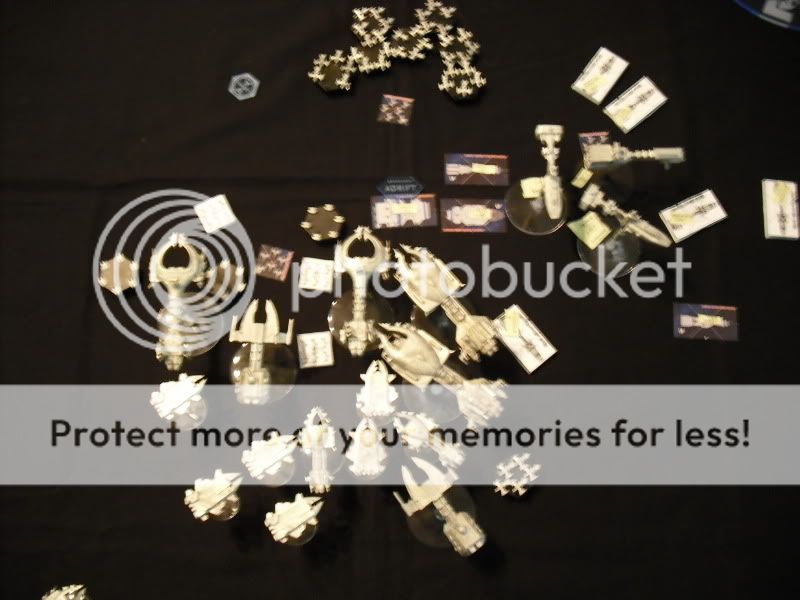
In the picture above you can see that my fleet is concentrated (piled, even) against the rear of the earther column. In the distance you can see the front of the formation (including a Nova, an Orestes, and several Hyperions) trying to turn around.
This blurrier (sorry) picture from above shows how concentrated the Dilgar forces are. You can see the white hyperion counters to the upper right that have all managed a rear boresight against a Tikrit. The fighters clustered together at top are all Thorun Torpedofighters.
Turn 3:
Initiative Dilgar. But earth has far too many ships to use as sinks.
The Dilgar take stock of damage dealt and received and decide to begin a staged withdrawal.
Pentacon Reaper heads straight away from the battle and toward the far edge of the board.
Pentacon Omen moves through the earth formation and hooks right to try and get a kill on the Hyperion Jakarta - one of the three Hyperions that had so damaged the Ravager last turn. Omen succeeds at an Alpha Strike! order.
The carrier Venom gives a Scramble! order and moves, turning to the right in an attempt to get off the board.
My primary mission right now is to save the two wounded Tikrit-class ships. If the enemy Sagittarius missile cruisers manage to unload into them I will most likely loose them and possibly the battle. The scout Finder bravely gathers the courage to do what must be done. It ramps up to ramming speed and hurls itself into the side of the Franklin, heavily damaging it. The next scout, Searcher gives the same order but fails the opposed crew quality roll and glides past Franklin to end up in the middle of the front of the earth formation - in broadside range of a Nova and an Omelos. Ouch.
The remaining frigates (two scouts and two Missile frigates), can't angle for a good ram but move to point blank range next to the two remaining Sagittarius cruisers.
The earth fleet is struggling to come about and engage the Dilgar. All of the forward ships continue to wheel right. With no other target in sight, seven ships (three Oracle, three Hyperions, and an Omelos) boresight the Garasoch Venom.
Toward the rear, the Omelos Alexander Suvorov makes a Come about! order and manages to rear-boresight a Dilgar missile frigate, the Pistol. The two Assault Hyperions move into firing range of the scout ships.
Dilgar fighters move to take attack position around the Sagittarius cruiser Franklin. A few fighters move to pin the remaining 5 Nova flights in a dogfight to keep them from interfering.
Earth scouts break the Dust Cloud stealth of the Venom and paint the Reaper. Dilgar scouts paint all the Sagittarius cruisers and the Hyperion Jakarta.
The torpedofighters do an excellent job of wrecking the wounded Franklin. The ship explodes spectacularly. Unfortunately I miss-gauged the distance and my fighters were also caught in the explosion. A grave tactical error cost me my entire force of assault fighters. A harsh lesson that I will not forget. Torpedofighters have a range of 6"!
Dilgar opened fire first, the frigatePistol fired and heavily wounded the Mercury.
Earth responded by firing upon and destroying Searcher before it could contribute anything meaningful. It's explosion in the close quarters damages several earth ships.
Command Destroyer Doctrine of the former scout pentacon fires and finishes off the last Sagittarius! I relax a bit, as I feel that I have taken massive pressure off of the poor Ravager and Reaper.
Earthforce then unleashes a hail of beam fire at the Garasoch Venom. Fully 24 dice of double damage beams are unleashed on the carrier. The gallant ship survives until the very last blast but finally crumples under the massive display of earth firepower. I make a note to try much harder to avoid earth boresights.
Pentacon Omen now fires on the earth cruiser Jakarta, vaporizing it in a hail of missiles and bolter fire. Sadly, I never get to see any repeated crits to leverage the Alpha Strike! order. But the job gets done.
--
This turn is beginning to see the tide turn. Earth's numbers are starting to show. The Dilgar have lost 3 frigates and a heavy carrier. Earth has lost two Sagittarius missile cruisers and a Hyperion. But next turn will see the forward half of the earth fleet finally bring its forward arcs (and boresights) toward the Dilgar contingent. The clock is running out.
Pentacon Reaper (on the right) begins to pull away from the battle. Pentacon Omen turns right to cover their escape.
Turn 4:
Initiative Dilgar.
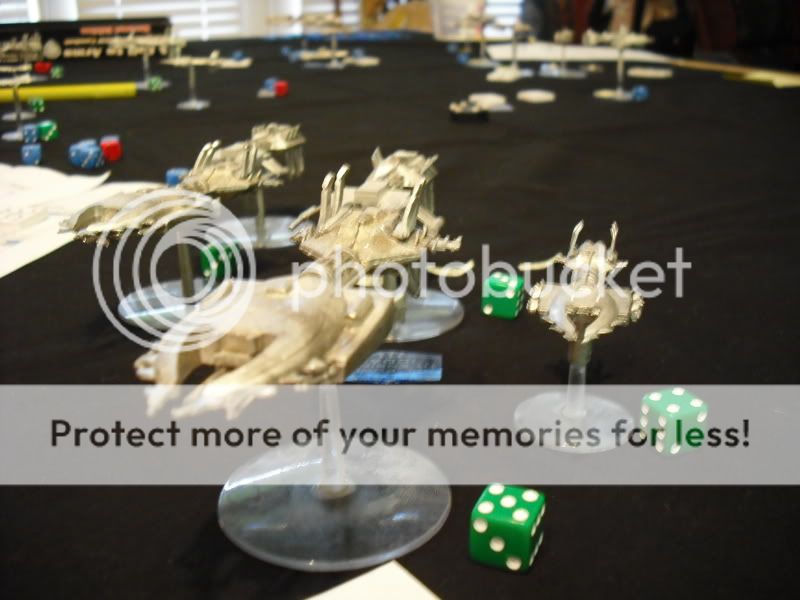
Pentacon Reaper continues to limp straight away from the battle zone.
Pentacon Reaper on the run. Will the wounded heavy cruisers manage to escape?
Pentacon Omen breaks up to init sink and races toward the far edge of the board as well. It's time to fly.
Only the command destroyer Doctrine is unable to get free of the earth formation. So it plunges bravely into the teeth of the enemy.
The earthers bring their fleet about. The only ship within range of meaningful fire is Doctrine. So they surround it and prepare for some revenge.
Then, I'm surprised by the Omelos Alexander Suvorov as it makes another Come About! order and manages to boresight the fleeing Ravager at 24" - just inside her range!
Doctrine defiantly fires upon an earth cruiser, scratching some paint. The Earthforce fleet then boards Doctrine and begin the process of capture.
The Alexander Suvorov fires its massive heavy laser crippling and skeletoning, but not killing, the Tikrit heavy cruiser Ravager, leaving it with a mere 2 points of damage and 1crew remaining!
--
This turn nearly saw the destruction of one of my largest ships. Had it been destroyed the game would have been much closer and may have forced me to do another battle pass to rebalance the scales.
I got lucky and disengaged at this point. The Dilgar fleet was battered and bruised but victorious! Earthforce complacency had been shattered.
Result:
Earth losses:
1 Avenger Heavy Carrier (3 VP)
2 Hyperion Heavy Cruisers (6 VP)
1 Nova Dreadnought (3 VP)
4 Sagittarius Missile Cruisers (8 VP)
1 Artemis Escort (2 VP)
1 Flight Nova Starfuries (1 VP)
----
23 VP
Dilgar losses:
1 Garasoch Heavy Carrier (3 VP)
2 Jashakar Vi Scouts (2 VP)
1 Jashakar Tae Torpedo Ship (1 VP)
1 Crippled Tikrit Heavy Cruiser (2 VP)
1 Ochlavita Ki Captured (4 VP)
Last man on board (5 VP)
---
17 VP
Dilgar victory!
Conclusion:
This mission was a picture perfect ambush. The mission plays perfectly to the strengths of the Dilgar - massive Attack Dice at close range. And was the bane of Earthforce - denial of forward arcs and boresights.
Attacking the rear of the formation allowed me to face half the enemy fleet and then disengage before the front could consolidate. The high speed an agility of Dilgar warships really made itself felt.
Campaign Aftermath:
Both sides suffered a great deal of damage, Earthforce catching the worst of it. The trade route was captured by the Dilgar and, more importantly, the XP earned by the dilgar ships allowed them to roll half a dozen "Other Duties" rolls, including one (Terror Reigns) which prohibits the Centauri from attacking the Dilgar in the next turn.
Elswhere, Earthforce lost a minor planet to the Centauri in a Carrier Clash mission. Earth might have had a chance, but a Dilgar raiding (another 'Other Duty') the previous turn reduced the Earther force by one point.
")
