robertsconley
Mongoose
For folks who may be interested in this stuff.
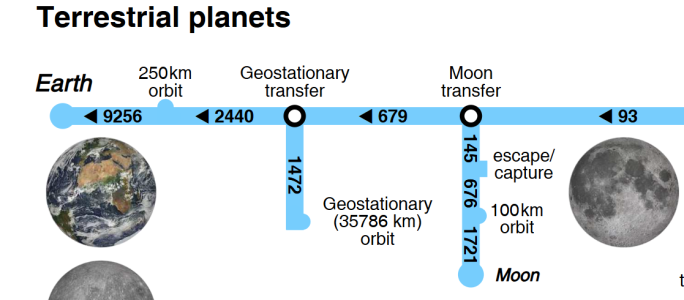
If you start out in a 250km orbit around the earth, and if you have roughly 4,000 m/sec delta vee of fuel left in your craft. You will be able to head out to the moon and settle into a 100km orbit. Around 3,100 m/s will need to be burned while you are in Earth orbit, and the rest when you enter the moon's sphere of influence and burn at the right time.
However, for an RPG campaign, you don't need to do the actual trajectory calculations. What you need is the total energy the trip will take and a good estimate of how long it will take.
If you're talking about a three-body situation like the sun-earth-mars. If you want to be accurate without doing the math, you will need to know how often optimal transfer windows open up (26 months for Earth, Mars). What is the best-case scenario for delta-vee expenditure (5,700 m/s) and the worst-case (let's call it 10 km/s). Then you can just roll to see how far away the next optimal transfer window is. If you are 6 months out for example, you can extrapolate to be 7.8 km/s). As for time, take half the orbital period of the target's orbit around the sun.
For something a bit more complex, let's consider the Gemini 6 mission to rendezvous with Gemini 7.
For this mission, NASA decided to do what they called a co-elliptic rendezvous in four orbits. The main reason is that they will have several opportunities to adjust the time of rendezvous for the optimal lighting conditions.
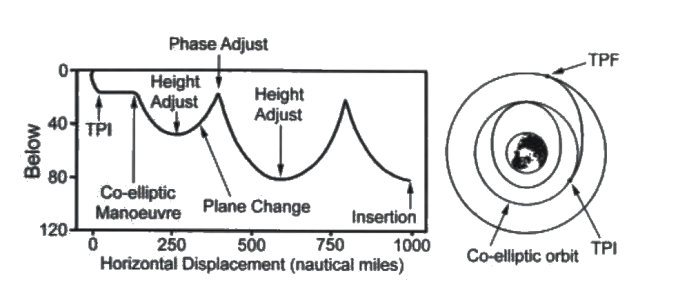
On the right, you can see the general scheme drawn as orbits around the Earth. On the left, you can see a plot of the range to the target and how far Gemini 6 will be below Gemini 7. Each peak you see is the apogee of Gemini 6's orbit as Gemini 7 is in a near circular orbit.
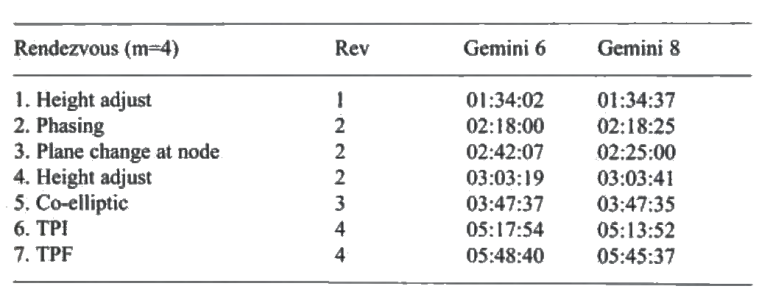
This what their maneuver plan looks like (also includes what happen on Gemini 8). Rev stands for Revolution (Orbit)
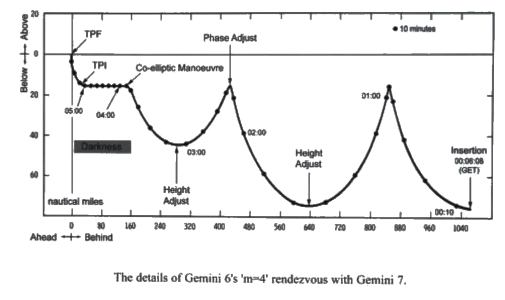
Here is the plot of Gemini with time marked as well as horizontal and vertical range from Gemini 7.
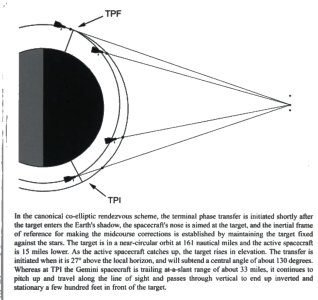
So as it turns it, it is pretty straight forward to do the terminal phase transfer. You need three things.
So what you do instead is start thrusting toward the target to maintain the right rate of closure while continuing to point your nose at the target. As you are below and behind the target, this will raise your orbit at first. Eventually, this will cause you to slow down faster relative to your target, but because you are always pointing at them, you will thrust to maintain the correct speed at the correct time. This effect is negated as you swing below and past the target. You will then curl around, still facing the target, and if you follow the plan correctly, you will be around 100 meters away at zero relative velocity (TPF)
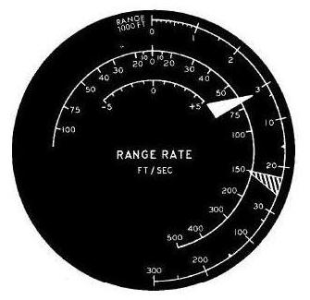
For Gemini 6, Wally Schirra was helped by this, which was configured to make it easy for him to maintain the correct velocity at the correct range. The goal was to keep the white indicator in line with the striped indicator.
Note on Gemini 12 with Jim Lovell and Buzz Aldrin the radar failed on the way to their Agena Target Vehicle. Buzz Aldrin used a set of charts that he had made before the flight and a sextant to guide his commander to rendezvous with the Agena. The principle was the same except Buzz Aldrin was using optical tools like the sextant to get range and rate of closure.
Hope this is helpful. The point is to give a referee a sense of what goes into realistic space maneuvers, so they can understand which skills would come into play at different times.
Maneuver Plans
For delta-vee maneuvers, you will need a plan of maneuvers (burns) to get from where you are now to where you want to be. Unlike most vehicles, you are not concerned with how long you can move for. Rather, you are concerned with how much you can change your velocity by. This is represented by how much of the total mass your craft is fuel (the mass ratio), how efficient your engines are (ISP/exhaust velocity) are. What this gets you in the end is a number called delta-vee, rated in meters per second.If you start out in a 250km orbit around the earth, and if you have roughly 4,000 m/sec delta vee of fuel left in your craft. You will be able to head out to the moon and settle into a 100km orbit. Around 3,100 m/s will need to be burned while you are in Earth orbit, and the rest when you enter the moon's sphere of influence and burn at the right time.
However, for an RPG campaign, you don't need to do the actual trajectory calculations. What you need is the total energy the trip will take and a good estimate of how long it will take.
If you're talking about a three-body situation like the sun-earth-mars. If you want to be accurate without doing the math, you will need to know how often optimal transfer windows open up (26 months for Earth, Mars). What is the best-case scenario for delta-vee expenditure (5,700 m/s) and the worst-case (let's call it 10 km/s). Then you can just roll to see how far away the next optimal transfer window is. If you are 6 months out for example, you can extrapolate to be 7.8 km/s). As for time, take half the orbital period of the target's orbit around the sun.

For something a bit more complex, let's consider the Gemini 6 mission to rendezvous with Gemini 7.
For this mission, NASA decided to do what they called a co-elliptic rendezvous in four orbits. The main reason is that they will have several opportunities to adjust the time of rendezvous for the optimal lighting conditions.

On the right, you can see the general scheme drawn as orbits around the Earth. On the left, you can see a plot of the range to the target and how far Gemini 6 will be below Gemini 7. Each peak you see is the apogee of Gemini 6's orbit as Gemini 7 is in a near circular orbit.
This what their maneuver plan looks like (also includes what happen on Gemini 8). Rev stands for Revolution (Orbit)

Here is the plot of Gemini with time marked as well as horizontal and vertical range from Gemini 7.

- Gemini 6 launched and then passed its first apogee (the highest point of its orbit).
- Then, at first perigee (lowest point), they executed a height adjust, which is the first step to get the timing for the rendezvous right.
- Then, at the 2nd apogee, they execute a second burn that was the most crucial in setting up the timing for the rendezvous.
- While not shown, on the way to the second perigee, they will arrive at a point where the orbital plane of Gemini 7 will intersect the orbital plane of Gemini 6. Gemini 6 will make a burn to align its orbital planes.
- Finally, a final height adjustment is made at the second perigee to tweak the timing further. Remember, there are small factors like atmospheric drag and solar wind, which cause small adjustments to be needed at various points to keep the trajectory on track.
- Finally, at the third apogee, Gemini 6 circularized its orbit about 15 nautical miles below Gemini to setup the terminal phase transfer at the TPI point.
Terminal Phase Transfer

So as it turns it, it is pretty straight forward to do the terminal phase transfer. You need three things.
- Range to Target (Radar)
- Rate of Closing (Radar)
- A Fixed Point in space (A Star)
So what you do instead is start thrusting toward the target to maintain the right rate of closure while continuing to point your nose at the target. As you are below and behind the target, this will raise your orbit at first. Eventually, this will cause you to slow down faster relative to your target, but because you are always pointing at them, you will thrust to maintain the correct speed at the correct time. This effect is negated as you swing below and past the target. You will then curl around, still facing the target, and if you follow the plan correctly, you will be around 100 meters away at zero relative velocity (TPF)
For Gemini 6, Wally Schirra was helped by this, which was configured to make it easy for him to maintain the correct velocity at the correct range. The goal was to keep the white indicator in line with the striped indicator.

Note on Gemini 12 with Jim Lovell and Buzz Aldrin the radar failed on the way to their Agena Target Vehicle. Buzz Aldrin used a set of charts that he had made before the flight and a sextant to guide his commander to rendezvous with the Agena. The principle was the same except Buzz Aldrin was using optical tools like the sextant to get range and rate of closure.
Hope this is helpful. The point is to give a referee a sense of what goes into realistic space maneuvers, so they can understand which skills would come into play at different times.
Last edited:

