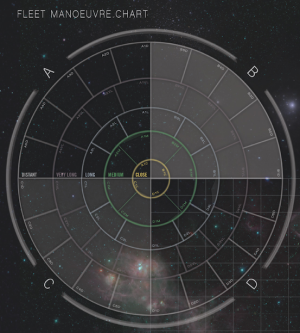
Rules Clarification: Range Determination using the Fleet Manoeuvre Chart (High Guard Update 2022, p123)

Yenaldlooshi

Banded Mongoose
In High Guard U2022 it states:
"..the Fleet Manoeuvre Chart allows you to determine the range to a target. This is determined by the position of the attacking fleet relative to its target."

The entry ends there with no elaboration or example of how one does this.

I can see how the chart might possibly be used to do that but it gives no example or guideline how this is done exactly. Does one count the squares from the quadrant/sector/range to the target across the chart? If so, how do you determine their value since the vary in size from box to box?
are you expected to use a laser line to see what is crossed from attacker to target?
is there some other method used?
 
If it's anything like HG2017:
High Guard'17, p92:
Attacks
Attacking another ship or squadron using the Fleet Manoeuvre Chart is done in the same way as normal for the Fleet Combat System. However, the Fleet Manoeuvre Chart allows you to work out the range to a target. This will be determined by the position of the attacking ship relative to its target, as shown here.
Target in same Sector: The target will be at adjacent range.
Target in adjacent Sector: The target is assumed to be at a range equal to the lowest Range Band either ships is in (so, if the target is at Long range and the attacker is in an adjacent sector at Very Long range, the range to the attack will be made at Long range).
Otherwise, an attack will be made at a Range equal to the highest Range Band of either ship.
Skärmavbild 2023-12-08 kl. 12.43.png


Pre-release discussion here:
https://forum.mongoosepublishing.com/threads/fleet-combat-system-movement.118845/post-900174
 
Last edited:
Are these examples correct then?:
A4D targeting A1D = Adjacent
A3D targeting D3VL = Distant
A3D targeting B1C = Close
A3D targeting A3L = Adjacent
 
Are these examples correct then?:
A4D targeting A1D = Adjacent
A3D targeting D3VL = Distant
A3D targeting B1C = Close
A3D targeting A3L = Adjacent
No, the main case is:
Otherwise, an attack will be made at a Range equal to the highest Range Band of either ship.

A sector is a "bent square", A4D is a sector and A1D is another sector.


A4D targeting A1D = Adjacent
Non-adjacent sectors, so the highest range, i.e. Distant range.

A3D targeting D3VL = Distant
Yes, non-adjacent, so highest range, i.e. Distant range.

A3D targeting B1C = Close
Non-adjacent sectors, so highest range, i.e. Distant range.

A3D targeting A3L = Adjacent
Non-adjacent sectors, so highest range, i.e. Distant range.

A3D to A3VL would be adjacent sectors, so shortest range, i.e. Very Long Range.
 
I think I get it. I thought a sector was all squares with the same number in the same quadrant. (ie all the "2's" are in "sector 2"). A single box is a sector then.

Let me test these:

A3d to another in A3d = adjacent ( and this is the only case of adjacent for A3d)
A3d to A2vl = Very Long (because they are next to each other).
A3d to A1d = Distant (not adjacent)
A3d to D2L = Distant (not adjacent)

Are these correct now?
 
Possible Errata: I noticed a typo in HG22. On page p124 under Movement has an example that states ends with "or they could expend 5 points of Thrust to move around the fixed point, to either Sector 2 at Medium range, or Sector 2 at Medium range in the B Quadrant."

This would be correct using the chart you gave above, but in U22 the chart has more squares and thus it the example text should end with "Medium range, or Sector 4 at Medium range in the B Quadrant."

Fleet Manoeuvre Chart.png
 
I wonder why this text from HG2017 was removed from HG2022;
"Target in same Sector: The target will be at adjacent range.
Target in adjacent Sector: The target is assumed to be at a range equal to the lowest Range Band either ships is in (so, if the target is at Long range and the attacker is in an adjacent sector at Very Long range, the range to the attack will be made at Long range).
Otherwise, an attack will be made at a Range equal to the highest Range Band of either ship."

but then nothing was given to replace it in HG22 other than to say "Manoeuvre Chart allows you to determine the range
to a target. This is determined by the position of the attacking fleet relative to its target."

It just leaves you hanging with no examples or description how to determine range other than to say it can be done.
 
Back
Top