Faces.... and help

BrettHartt

Mongoose
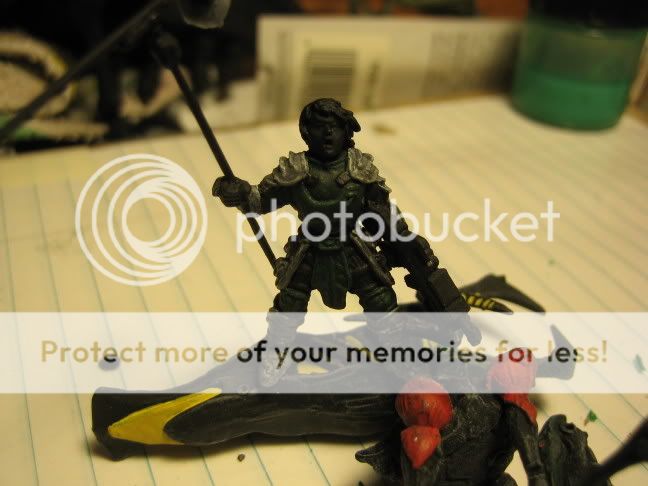
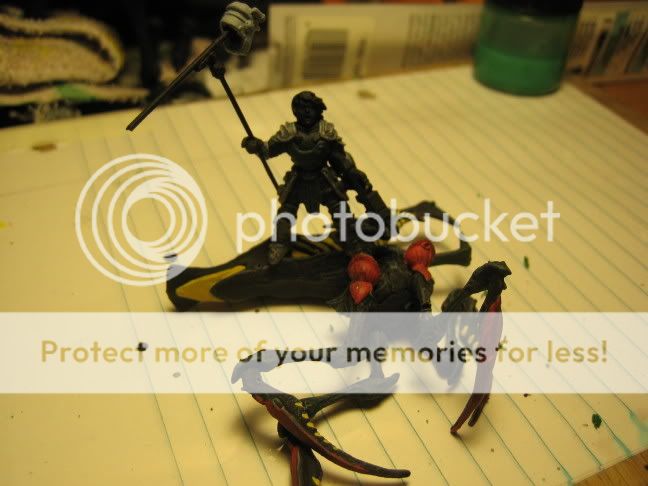
Ok, so im making a little diorama out of my standard bearer. Mind you this is the first MI that I have painted, and the only other human figures that I have painted were GoMC-1. So this is really my first time experimenting with highlighting (i just drybrush bugs most of the time). For the most part, it turned out pretty well, but it is hard to tell from the picture. Anyway, I eventually got close enough to finishing that I figured that I should start thinking about painting the face. I have painted some faces before (GoMC-1), but they all looked extremely surprised, as if they just saw a huge pile of umpty candy appear right in front of them. Also, they are really washed out. So, what tips can you offer me for painting this metal MI lady? How should I do the face (how do i do the face) And more importantly, any tips to offer. Keep in mind, the lighting is quite poor in these photos (the lighting in my room severly deteriorates after about 4 o'clock). So anyway, here are some photos that I took WIP.

Brett Hartt

20060520_IMG_0005.jpg


20060520_IMG_0008.jpg


20060520_IMG_0007.jpg


Any comments and critiques (especially the latter) are welcome.
 
Hello there
Please refer to my post on inks with the magic p.v.a/ink mix .
Ok heres how i do faces
paint the entire skin area a sunburnt flesh colour
give all flesh a ink wash of Chestnut brown slightly watered down.
look at the most pronounced features nose , forehead, cheeks, chin ect.
On your palette take a little of the sunburnt flesh colour and add a little lighter flesh colour , and mix well slightly let it down with water.
apply carefully to pronounced features.
add a little more light flesh colour and repeat the above.
make up a very thin flesh ink wash and apply it , let it dry thoroughly.
repeat the above process until YOU are happy with the process.
What you should have here is a feathering technique which will take practice and you will need patience and a fine brush .
The final stage is to accent the features by highlighting with your ink , in the grooves of the face , under the lips ect.
The eyes are the tough part-do you want tired and haggard or fresh outta the grinder just got lucky ?
Tired and haggard
In the eye sockets paint a light grey mixed with flesh , then on top of that
a dark brown just leaving a 'ring of grey' , then finally paint the eye area
black (this gives the eyeliner effect and almost the 1000yard stare) then very carefully paint in the whites using very thin white. a final dot of black
for the pupils - and its done.
Fresh outta the grinder- just got lucky
follow the above but instead of grey mix a little white with the flesh colour
then instead of dark brown use normal flesh with a little bit of brown
then follow the other instructions.
Dont be put off its a long process , but practise practise
john :wink:
 
I just use a three stage highlight..... start with the darkest tone as an undercoat (a deep tanned flesh) then paint over with the mid tone, leaving the creases and sides of the nose etc... dark, then apply the final highlight to the most exposed areas... cheek bones, forehead, bridge of nose. Pretty quick and looks really good. I stopped bothering with inks etc... ages ago when I got the wargames foundry paint set.
The pred and sicon were painted like this.
DSCF0068.jpg


must get more photos :)
 
Must admit, I only use ink washes on 54mm figures and figures that have more flesh on show than just faces and hands, otherwise I just use the 3-stage technique.

If most of your models are looking surprised, then you are painting the eyes wrong, plain and simple. My guess is you are painting the whites of the eyes, then the iris/pupil afterwards. This tends to make the face look surprised 'cos you can see white all around the pupil/iris.

2 ways to solve this, 1 is to paint the white of the eye, then when you paint the pupil/iris, run the paint right down to the bottom of the eye, then right up to the top. You might also want to run a thin line of slightly darker flesh above and below the eye to "tighten up" the painting and cover up any areas where the paint has run over the line of the eye.

The second way of doing it is to paint the pupil/iris first in a dark grey or black, then put 2 small triangles of white either side of the area you want as the pupil/iris. The problem with this last technique is that it takes a lot of practice to stop the eyes from looking cross-eyed!
 
Paint it a flesh tone which is basically any pinkish or reddish brown lightly wash it with thinned dark brown paint or ink with a little but of varnish in it then dry brush it very lightly with the original base coat colour and you will have a good basic face.

Don’t whatever you do try to paint the lips as they will end up looking like a clown’s mouth unless you are very careful and don’t paint eyes as they are over scale on 25-28mm figures and look wrong.

I would recommend foundry paints and the only difference here would be that you would do a second even lighter dry brush with the highlight colour. I have this figure but the face is a bit miscast so it doesn’t look all that good on mine had to do some filling on the cheek which rather spoils it. Would have posted a picture of another figure but the camera defiantly needs new batteries
 
I could suggest painting it white then inking it flesh wash to see where the details are. All the whiter bits paint light fleshtone (GW elf flesh). I used to do this as a beginner until I became accustomed to what I needed to paint. Its very easy to be a 'good' painter, just dont rush things and have patience.
 
Back
Top