Feedback wanted on board idea

And now for the feedback- thanks!

  • The seams don't really detract from the board's overall look.

    Votes: 0 0.0%
  • No thanks. I'll just toss a blanket over the table if I want portability.

    Votes: 0 0.0%

  • Total voters
    0

BuShips

Cosmic Mongoose
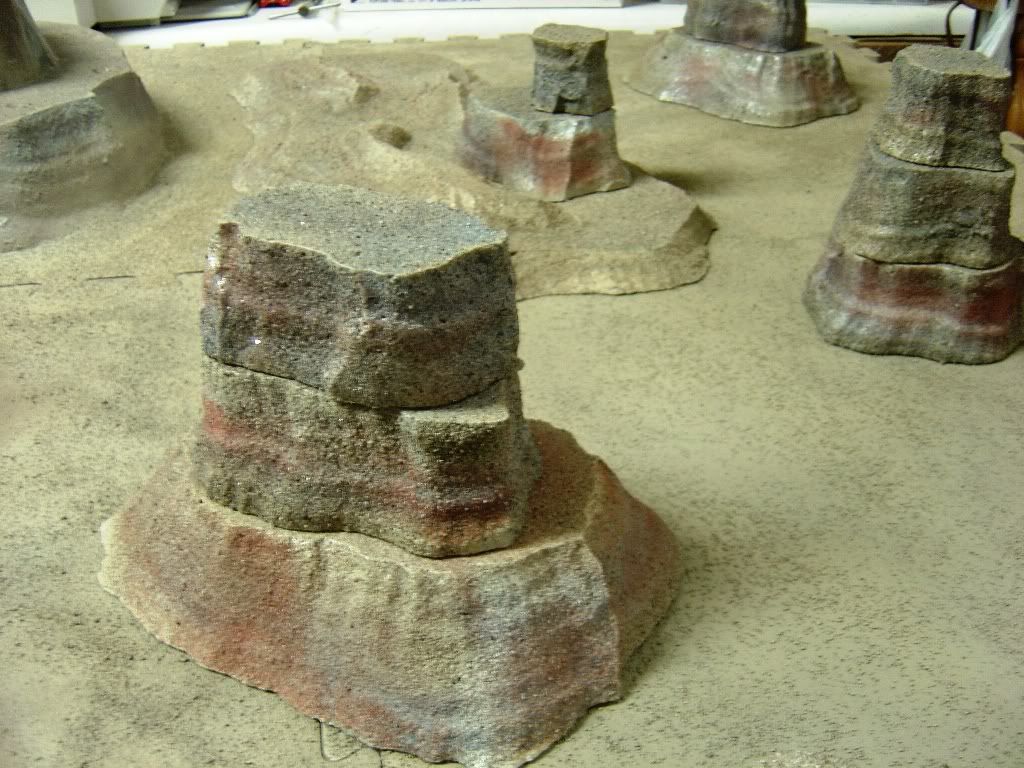
This is a 4'x6' terrain board that I'm working on that is designed to break down to be portable. It is based upon dense foam mats that interlock with a puzzle-style border.

Only the large two-level rock piece (6" in height) is permanently mounted to a 2'x2' board section, with the other "table rocks" being made to be loose and stackable. Basically, I'd like to know from a few of you here what your impressions are about this board design and your acceptance of viewable seams on the table.

This design is obviously a trade-off to be able to have a flexible and portable board that has the ability to be made up into a single, interlocking game surface. I've had to use special flexible paint in order to not have the paint detach once it has been applied. I've also carved some small relief (crevasses and craters) into the surface as well as added the sandy texture.

I'll include a photo with several MI Nighthawks on patrol encountering "resistance" to their walkabout. :wink:

TABLE_ROCK_3.jpg


TABLE_ROCK_2.jpg


Nighthawk_Patrol_4.jpg
 
Seams are visible, but are nowhere near to being bothersome, and overall effect is excellent <thumbs-up>
 
If the pieces really fit together that cleanly I'd be all over something like this. WAY BETTER than a blanket LOL!. I wouldn't be tha slightest bit bothered by the seams.
 
Thanks for the input guys. I need this sort of thing from time to time in order to keep me straight, since I'm a "viewpoint of one". :D

Some of the thoughts that I've used is that if I have some of the board segments with attached features (such as the one with the stepped table rock) then I can place it in different positions. Thus you can have several ways in which to assemble it.

As to the paint that I used, it isn't cheap sadly. In order to get something that will not flake off and also have an ability to flex a bit, I used automotive touch up paint designed for bumpers or "bumper coater". If I can locate a brush-on version in bulk liquid it might bring the cost down. I used spray cans at like $12/can.

It was important to lock-in the partially painted sand that I used for surface texture and needed to buy even more cans of a clear version of the paint. The large rocky hill had to be made of flexible foam as well, and could not be made of regular rigid Styro.

Call this board a prototype of something that I would someday like to offer. I'll still monitor this thread for additional input but you guys have helped a bunch. :)
 
Here is a bit better pic for the overall layout. 6'x4' seems to be a very functional size, although of course I can expand it later. :)

I threw out some moss and pebbles onto it as well. The odds are getting worse it seems for our MI mechanized patrol. :wink:

TABLE_ROCK_4.jpg


Oh, and please ignore the background clutter, as artists are always a bit unorganized. :roll:
 
Very, very nice ! That is great idea for a modular board, the squares look familiar although I can't place where I have seen them before... Again, great job !
 
usmc8892 said:
Very, very nice ! That is great idea for a modular board, the squares look familiar although I can't place where I have seen them before... Again, great job !

My "raw material" is 24" square exercise mats. :D Is that what you might have been thinking about?

Although it's not a major feature of the design, you can of course rotate each panel into four positions (duh). Combine that with the greater value of repositioning the mats into various locations can give you some variance with the board layout. It's mostly seen with the one section sporting the "mountain". It can be in a corner/end position or in a middle area of the board, providing "high ground".
 
As usual, KILLER work!!!!

Looks great!

Maybe you should also consider cutting them down to give either 1x2 or even 1x1 sections? Give more options that way!

Regards,

Dave
 
I really like this idea. Whenever we play with a sheet, it moves around so much!
I might even use this idea! It looks great, the seams make little difference imo. Can't have taken long to do either.

Did you sand them then paint them yeah? I like the scenery too.
 
ScipioAmericanus said:
Maybe you should also consider cutting them down to give either 1x2 or even 1x1 sections? Give more options that way!

Regards,

Dave

Certainly a possibility, but so far I'm working with the 2x2-foot sizing. :)


Rob_A said:
I really like this idea. Whenever we play with a sheet, it moves around so much!
I might even use this idea! It looks great, the seams make little difference imo. Can't have taken long to do either.

Did you sand them then paint them yeah? I like the scenery too.

The real trick with this is that you need flexible paint that will not crack/craze when the panel is bent. First, I had to use a special product that bonds paint to plastic. My favorite standard of using the economical Krylon Fusion for this was not good enough for this purpose. After prepping the surface with the bonding coat, I used (as I mentioned before) specialty auto paint that is flexible. Using two sand sources, one finer grained than the other, I needed to bond this down under additional coats of spray. Then I applied a clear coat of a transparent version of the auto paint (again, flexible) to help seal everything in.

If you were brave, you could try following my basic method and use cheaper paint. You'd just have to be very gentle with the final product. Even as my method was followed, I'd still be suggesting to not abuse the material a lot, such as putting your full weight on it or bending it more than you would need to in normal use. For example, when the Geo-Hex terrain system was being sold over the last 20 years, those that took care of their flocked Styrofoam 3/4"-thick by 12" hexes got years of use. Those that did not ended up with hundreds of dollars of Styro packing material. :roll:

Rob, for the "above-surface" rocks I used hot-wire cut 2" Styrofoam, painted with Krylon H2o and garnished with sand. The sand added nice texture, color, and importantly strength. I sealed them with a water-based clear sealer (Minwax Polycrylic).

Oh, the rust-red color in the rocks is yet a third sand variety. For this I used some craft sand, available in stained colors.
 
Scotty59 said:
That's some great looking terrain! Very nice work.

Thanks, Scotty59!

I know that I really don't have to name it, but I'm calling it "Table Rock Valley". :wink:

Of course, it's a valley on another planet. Well, let's hope for Earth's sake that it's on another planet. :lol:
 
I think it looks great, it makes alot of sense and it offers alot of flexability. I think you could sell a lot of these if you did decide to offer them as such. A bit of design work and some different themes and flavours.

Really great work :)
 
Hello again, could you please advise the brand names of the products used to prep, paint and seal the exercise mat squares ? I would like to try my hand at making a similar table. A tutorial would be great! Of course if its a trade secret I understand.
 
usmc8892 said:
Hello again, could you please advise the brand names of the products used to prep, paint and seal the exercise mat squares ? I would like to try my hand at making a similar table. A tutorial would be great! Of course if its a trade secret I understand.

I am both a "hobbiest/gamer" and am also currently revamping my old company that "used" to sell gaming structures and terrain pieces. I've given up "secrets" before, in the form of terrain articles for Signs & Portents and here on the forums. :)

The paint adhesion promoter was by Klean-Strip. They call it BULLDOG, and it goes on clear. I used a light coat (and this is important) on the smooth underside of the mats. The embossed texture on the upper side was too pronounced to attempt to cover up so I flipped the mats over and did my painting on that side.

The paints were all automotive, as I mentioned before. SEM makes both pigmented and clear automotive spray paints. It's basically flexible bumper-coater. A piece of trivia is that I learned of this from an old employer of mine- Thrustmaster. They were/are a premium computer game joystick company. I worked for them in the "early days", when they were making joysticks and throttles in the owner's home garage (yup!). Black bumper coater was used as a finish, airbrushed on. I'm sure that they have improved their production process by now, but the method worked very well. You now have all of the brand names, but I had left enough clues before that it would have been easy enough to ask your local retail auto paint store. Bumper coater was the key phrase. :wink:

If any of you get your own done up, go ahead and post it here, as it can only help the "greater good" of gaming. I promise that when I come up with a really brilliant idea, I'll keep it a professional secret, heh. :lol:
 
Back
Top